Back to School


Welcome back!  We spent our first full week with our students last week!  We divided our time among getting to know you activities and building community, going over ESL classroom expectations, assessments, and launching our classroom reading program.  

While all of those things are essential this time of year, my favorite is getting my students excited about reading. After completing running records with a small comprehension check, I determined everyone's individual reading level.  Then, we jumped in.  We read Dr. Seuss's Oh the Places You'll Go. We looked at the popular graphic of how reading 20 minutes each day of the school year, helps you become a better student.  We learned what our just right books are and how are reading levels match up with our classroom library.  (For more information on how I set mine up, click here.)  We set personal reading goals and checked out our first book.

It called for a mini celebration! 


A little photo booth fun...


I can't wait to see how many books we devour this year!

Happy Adventuring, 
Heidi


ESL Practice Packet: Plant Life Cycles

I have finished creating my second ESL Practice Packet.  This one includes a listening, speaking, reading, and writing activity all centered on the topic of plant life cycles.  


The speaking activity has students describing how sunflowers change during their life cycles as well as the role bees play as pollinators.   The listening activity has students reviewing a diagram on the life cycle of a pumpkin.  The reading activity is a fiction text about a student who visits a field of sunflowers during a field trip.  The writing activity asks students to compare and contrast the sunflower and pumpkin life cycles.  

Here is what is included in the pack:
*Speaking:  background text, model examples, questions for the students to respond to, and a rubric.

*Listening:  teacher script, student questions, and an answer key.

*Reading:  text, student questions, and an answer key.

*Writing:  background information, writing prompt, writer's checklist, and a rubric.

**Special Note- I use these activities with ESL students who are in grades 3-5 and are at the intermediate to high levels of language acquisition.**


I use the practice packets as a way to assess student learning at the end of a unit as well as prepare them for annual ESL testing.  You could also use as a teaching tool during your plant unit.  Click on the link above the picture to check it out in my TPT store.  

Happy Adventuring, 
Heidi


1,481 Books!

 My students read and retold a combined total of 1,481 books this school year!


Outside of  ESL class...
Books they got to choose...
On their just right reading level...
I couldn't be prouder!!!

This year I had 6 pull out ESL groups with a total of 32 students.  They all contributed to 
a class goal of 100 books at a time.  At the end of this year, I added them up so we could celebrate our accomplishment. 

I love seeing my students' faces as they retell books they loved, select new books, become better readers, and get to move up in reading levels.  Also, when my students fill out their top ten things they liked about ESL for the year, the reading program is on every single student's list! 

For more information on how I set up my classroom reading program, see my post on Classroom Library and Reading Program.

Happy Adventuring,
Heidi

Pairing Content with Language

As an ESL teacher, how do you decide what to teach?  We are a WIDA state and follow their standards.  In my district, we don't have a particular ESL curriculum.   My students come to ESL for an hour pull out group.  Due to scheduling, a lot of my students miss their science and social studies instruction time with their class.   Therefore, I am always looking for ways to mesh grade level content standards with our language acquisition standards so that students can get the most of their time out in ESL.  I know I can get a whole lot of reading and language taught with science and social studies text so that is where I start.

Today I wanted to share with you how I accomplish this.  For example, I know that my third and fourth graders both have standards related to how energy moves in food chains.  I pair that content up with language skills of sequencing, interpreting graphs, and writing to describe processes.  

I start my units by seeing what students already know about a topic and building background knowledge.  This could be with graphic organizers where students show what they know, labeling a picture with vocabulary they already know, or a quick preassessment.

I select important words that students need to understand concepts as well as key science vocabulary and make unlabeled picture cards for each word.  We spend a few minutes each day reviewing words and playing vocabulary games. 

Then, we read as much as we can on food chains, food webs, energy pyramids, etc.  We watch video clips, make our own flowcharts using manipulatives, act out the parts, think pair share with a partner or group, etc.  I am consistently monitoring for understanding during activities as well as with quick writes and exit tickets.  

At the end of the unit, I want to assess student learning.  I have recently started creating some ESL packs that allow me to assess their understanding of content standards as well as practice the four domains of language.  I am very excited about these because they are an efficient way to monitor learning and practice for our annual ESL test.

Here is what is included in each practice pack:
*Speaking:  background text, model examples, questions for the students to respond to, and a rubric.
*Listening:  teacher script, student questions, and an answer key.
*Reading:  text, student questions, and an answer key.
*Writing:  background information, writing prompt, writer's checklist, and a rubric.

**Special Note- I use these activities with ESL students who are in grades 3-5 and are at the intermediate to high levels of language acquisition.**

Click on the link to see some sample pages in my store.
Food Chains: ESL Practice Packets


Food Chains ESL Practice Packets

I am finishing up my plants practice packet and have so many ideas for other content themes!

Happy Adventuring,
Heidi

Think and Writes: List and Describe the Picture

The last two skills I am going to share with you in my "Think and Writes" series are List and Describe the Picture. Check the bottom of this post for links to the previous posts in this series.

List is my students' all time favorite.  I always save it for Fridays.  It is a fun way to see what vocabulary words students know within a certain topic or theme.  List is exactly like it sounds.  I put a topic on the board.  The students have 4 minutes to write a list of all the words they think fit in that topic.  Spelling does not matter.  If they can't think of the word in English, then they can write out a description.   If they are not sure it fits the category, they can write it anyway, and we will discuss at the end.

When the 4 minutes is up, we go around the room and start naming the words they wrote.  I record the words on the white board.  If you wrote a word that has been called by a classmate, you put a check by it.  This gives us a chance to share what words we know as well as introduce some new words that classmates know.   When we are out of words, we count them and write our total on the board.  This is the one "Think and Write" that I don't differentiate for grade levels or language acquisition.  We have a little competition to see which group could think of the highest number of words.  On Monday, I give the winning group a sticker for their notebooks.  It is rare that the same group wins two weeks in a row.

Here are some topics I have used:  transportation, things with numbers, weather words, animal adaptations, U.S. states, character traits, landforms, color words, animals with wings, vegetables, etc.  


Depending on my levels of language acquisition, I call the final "Think and Writes" either Describe the Picture or I See.  My goal for this skill is to get students to write detailed sentences or paragraphs about what they see.  I scaffold this with a teacher example (of a different picture) and a paragraph frame.  As the year progresses, I can take away that scaffolding if it is no longer needed.  I ask the class what words they need from the picture, and we will work together to label the picture.  It is like we are making a word box.  Then students will write to describe what they notice in the picture.  For my higher students, I encourage them to start their writing with a topic sentence.  I use the hamburger model a lot when teaching writing so I may have a hamburger drawn on the screen. 


In the classroom, I write the words students call out directly on the white board where my picture is projected. 

As students finish their writing, I remind them to reread their sentences to see if they make sense.  A lot of mistakes can be caught by just reading aloud.   I then read their sentences and give feedback on capitalization, punctuation, academic vocabulary, sentence structure, etc.  This"Think and Write" skill takes the longest so I sometimes let them just share their favorite sentence with the class. 

I hope this series has been helpful.  Click below to visit my previous posts on "Think and Writes."


Happy Adventuring, 
Heidi

Think and Writes: Here's the Answer. What's the Question?

The next skill I'd like to share with you in my "Think and Writes" series is called "Here's the Answer: What's the Question?" This is definitely a higher order thinking skill that needs a lot of direct instruction and scaffolding at first, but they love the challenge!  I tell students they are the teacher.  Their job is to come up with a question that goes with the answer I give them.  

Here is an example from our plant unit:  


I am asking the students to come up with a question that can be answered with "the roots." 
Students might write, "What part of a plant soaks up water and minerals?", "What part of a plant anchors the plant in the soil?",  "What part of a plant is underground?"  All these questions can be answered with the roots.  It is amazing how many different questions they come up with! 

An error that students make at first is trying to put the answer in their questions.  They might write, "What do the roots do?"  Well it doesn't make sense to answer that question with the roots.  We always talk about how you usually can't put the answer in your question; it just won't make sense. 

One way I scaffold students with this activity is by having a question words bulletin board up.  I find students get the question words confused on a frequent basis.  I have the most common question words up with the reason we use them, a sentence, and picture example of each.  When I am first teaching this "Think and Write" activity, we go over each question word and how it is used.  If students are stuck, we read each question word and see what one matches our answer.  For instance, Can we use who when our answer is roots?  No.  Can we use where?  Probably  not.  Can we use what?  Yes, because roots are a thing.  

Another way I scaffold students is by writing a question sentence frame in the dialogue box.  So if I had lower levels of language acquisition or if we were just learning this skill I might have a slide like this:
Or I might just have the question word in the sentence frame.

The possibilities are endless with this activity as well.  I use this skill weekly with whatever unit we are covering.  It gives me a quick check into their question words, writing, and understanding of key vocabulary.  This week, I am teaching American Inventors so my answer was "Benjamin Franklin."  Some of my students' questions were "Who invented bifocals?", "Who helped start the first library?", "Who was a founding father of our country?"  I love it!  I also got this one, "Who are we studying about in ESL?"  Technically that works, but I always say be more specific to the answer.  

If you are new to this series, check out my first post on "Think and Writes."  There is a sample pack available.  Plus check out  my "Think and Writes: Plant Pack."


Happy adventuring, 
Heidi

ESL Classroom Library and Reading Program

How do you motivate your students to read during their free time?  I want my students reading all the time!  One way I try to promote this is with my classroom library.  I stock my library with books from every genre, across the Lexile bands, with popular characters and classics, picture books and chapter books.  I ask students what series they like and buy those as often as I can.  I order new books from Scholastic almost monthly and have a bin designated just for new books.  They are always excited when they see new arrivals-almost as much as me!  


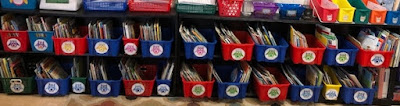
Here's how I have set up my classroom library and reading program:  First, I want students reading books they can understand at their independent reading level.  I assess students with running records and retells.  I assign them a Lexile range they can select their books from.  I have leveled all my books with color coded stickers on them to represent Lexiles.  Those books are organized in bins by their levels.  Students are assigned a sticker color and know which bins they can select from.  They are allowed to check out one book at a time.

Second, I make sure that all the bins have plenty to choose from.  I want students to enjoy what they read!  If they check out a book and don't like it, I want them to exchange it for another.  
Close up!


Chapter book series

Third, I encourage an optional reading challenge to hold students accountable for their reading.  I don't want to make it burdensome, but I also don't want to just go by students' word that they read their books.  What works for me is to have students retell their books to me.  It only takes a few minutes.  When students come in for the class, they sign their name on the board if they are ready to retell a book to me.  This lets me see how much time I need to set aside to listen to retells.  Towards the end of class, while other students are working independently, I call a student over to retell his/her book to me. I want it to be low key.  I skim through the book while they retell the main points or I ask them some basic comprehension questions from the text. After doing this for three years, I have many books memorized.   If students can retell their book well, they get to go put a sticker on our team Read and Retell Challenge board.  If they are having trouble retelling or just telling me about the pictures, I ask them to read the book again or switch it out if they would rather.  

The corner of my white board


I print my Read and Retell Challenge boards on 6 different colors of paper-one to represent each group of ESL students I have throughout each day.  The sticker chart is a team effort.  No one is singled out for reading or not reading.  They love competing with the other groups though.  
Once we reach 100, we celebrate our reading with a party!  I break out the board games and bring in a fun snack.  
Read and Retell Challenges bulletin board


Some completed challenges so far this year!


A few extra notes on my reading program:
*This is what works for me.  It has been tweaked and adjusted over the years.  

*I keep a log of who has checked out what books, when they have returned them, and if they could retell it.  This keeps up with my books and allows me to keep up with how many books each student has read.  It is just a binder with notebook paper and dividers.  

*Every Monday, I announce top readers from the previous week.  To be a top reader, you have to earn 5 stickers the week before (basically one a day).  

*I give one sticker for a standard picture book and multiple stickers for chapter books.  
For instance, if they read a chapter book with 90 pages, I would give three stickers.  

*Students have a reading folder with a log and pocket to put their book in.  Each log has 20 lines.  Once a student has completed a log, I reassess their reading with running records to determine if they are ready to move up to the next Lexile (colored sticker) level. 

*Even though this is a voluntary program, 95% of my students are engaged and reading on a consistent basis.  

**I need more bookshelves for my book addiction.  
**I could talk about this all day.

I have updated my Read and Retell Challenge Board.  You can download it for free by clicking on the link below. 


Read and Retell Challenge

Happy adventuring,
Heidi 

Writing for Beginners: Part 1

Writing For Beginners: Part 1


As a pull-out ESL teacher, I typically see 6-8 students at time for 60-90 minutes a day. We try to do some form of writing every day. So today, I want to share some strategies for teaching writing to Newcomer ESL students or early elementary students with very limited English language proficiency. These are not new strategies, but I have combined them in a sequence that I have found to be very effective. There are about 6 stages and students will spend various amounts in each stage, depending on how quickly language acquisition happens for them. In this blog post, I will focus on the first 3 stages. 

Stage 1: Drawing with Dictation

For Newcomers, this may be all they can do for a while as they are so very limited in their knowledge of English vocabulary.
  • Drawings should be used in response to content. If you are learning about school supplies, students should be drawing something that relates to that topic every day.
  • Teacher always models first.
  • Student should always dictate or tell you something (word or sentence) about his picture. The teacher will write the dictation on the drawing or write in highlighter and the student can trace the word. This dictation is what helps students to understand the relationship between the spoken word and the written word.
  • Students should always share his words and pictures with peers.
  • As a student begins to acquire more language, he will be able to share more words about his picture. 

Stage 2: Drawing with Labels

As soon as students start to develop a basic level of vocabulary (school tools, family, animals) and a beginning knowledge of letter sound relationships, the student is ready to start labeling his pictures.
  • Start with an anchor lesson and an anchor chart for students to refer to. There are lots of ideas for labeling anchor charts on Pinterest.
  • Model the process of drawing a picture and writing a label next to your drawing.
  • During this stage, we also start adding more detail to our drawings. This will give them more to label. I ask each student to label 3 objects in every drawing. I also like to use a simple picture rubric to help them analyze their drawings.
  • This step can be differentiated based on a students phonemic awareness and ability to segment phonemes in a word. Since ability may differ within the group, some students may be able to label with more sounds then others.
  • We usually start labeling with beginning sound, then progress to beginning and final sound and then on to beginning, middle and ending sound. 
  • Finally, students will share their words and pictures with peers.

Stage 3: Sentence Frames

Sentence frames are one of the most powerful tools in an ESL teacher's toolbox. I love the way that they can be used for both speaking and writing. 
  • Sentence frames help establish the connection between oral language and writing. Oral language must be practiced and developed before a student can become a competent writer. If you can't say it, you can't write it!
  • Starting with a simple sentence frame like "I see _____", students practice the sentence orally before writing it. Students will copy or trace the sentence frame, then, using the labels from their drawing, they will complete the sentence. 
  • Integrate the sight words that students are learning into the sentence frames that you introduce.
    An example of a sentence frame from my "Transportation Unit". TLW draw and label the car and then use his labels to complete the sentence frame.

    I could go on and on about using sentence frames in writing, but this post is starting to get really long-winded! Stay tuned Writing with Beginners: Part 2!

    Happy Adventuring,

    Beth

Think and Writes: What Doesn't Belong?

  Today, I am going to share another skill I use with my "Think and Writes."  I use these activities as bell work while waiting for all my students to show up.  Please see my previous post on
"Think and Writes" for a little more background on these activities.

  A What Doesn't Belong prompt always has four pictures with labels.  The goal is for students to find a commonality between three of the pictures so they can figure out which picture will not fit in that category.  

  We are currently studying map reading in 3rd grade.  Here are some labeled pictures I am using with this theme:  a compass rose, map key, calculator, and map scale.  Students will hopefully see that three of the pictures are tools used to read a map.  They will then write a sentence in their journal to explain their thinking.  I usually put this sentence frame up along with the pictures.  The __________ doesn't belong because _______________________.  Students may write- The calculator doesn't belong because it is tool for doing math, not for reading maps.   

   The tricky part for a lot of students is that they will want to focus on one special thing about an object and not what they all have in common.  So for instance, someone might say, "The compass rose doesn't belong because it shows directions but the others don't show directions."  I would not accept this answer, because it doesn't group the map key, calculator, and map scale together.  It takes practice, but students will get there and come up with some great categories. 

  Here are some other ideas you could use:  If you were teaching land forms, you could have a picture of a lake, a mountain, a plateau, and a canyon.  The lake doesn't belong because it is a body of water not a land form.  Teaching musical instruments?  a flute, an oboe, a drum, and a clarinet.  The drum doesn't belong because it is not an instrument you blow into.  Teaching food chains?  3 carnivores and 1 herbivore.   

  Please check out my sample pack by clicking the link below to see some slides of how I use this in my class and how I differentiate it for my different levels of language acquisition.  


  I have a couple more skills I will share that go with this series of Think and Writes.

Happy Adventuring, 
Heidi